Restoration / Authentication
1972 White Sox "Back from the Dead"
Call this one "Back from the Dead"-- 1972 White Sox Jersey restoration completed in June 2023. There are not many of these relics left, folks. Read on for the full story.
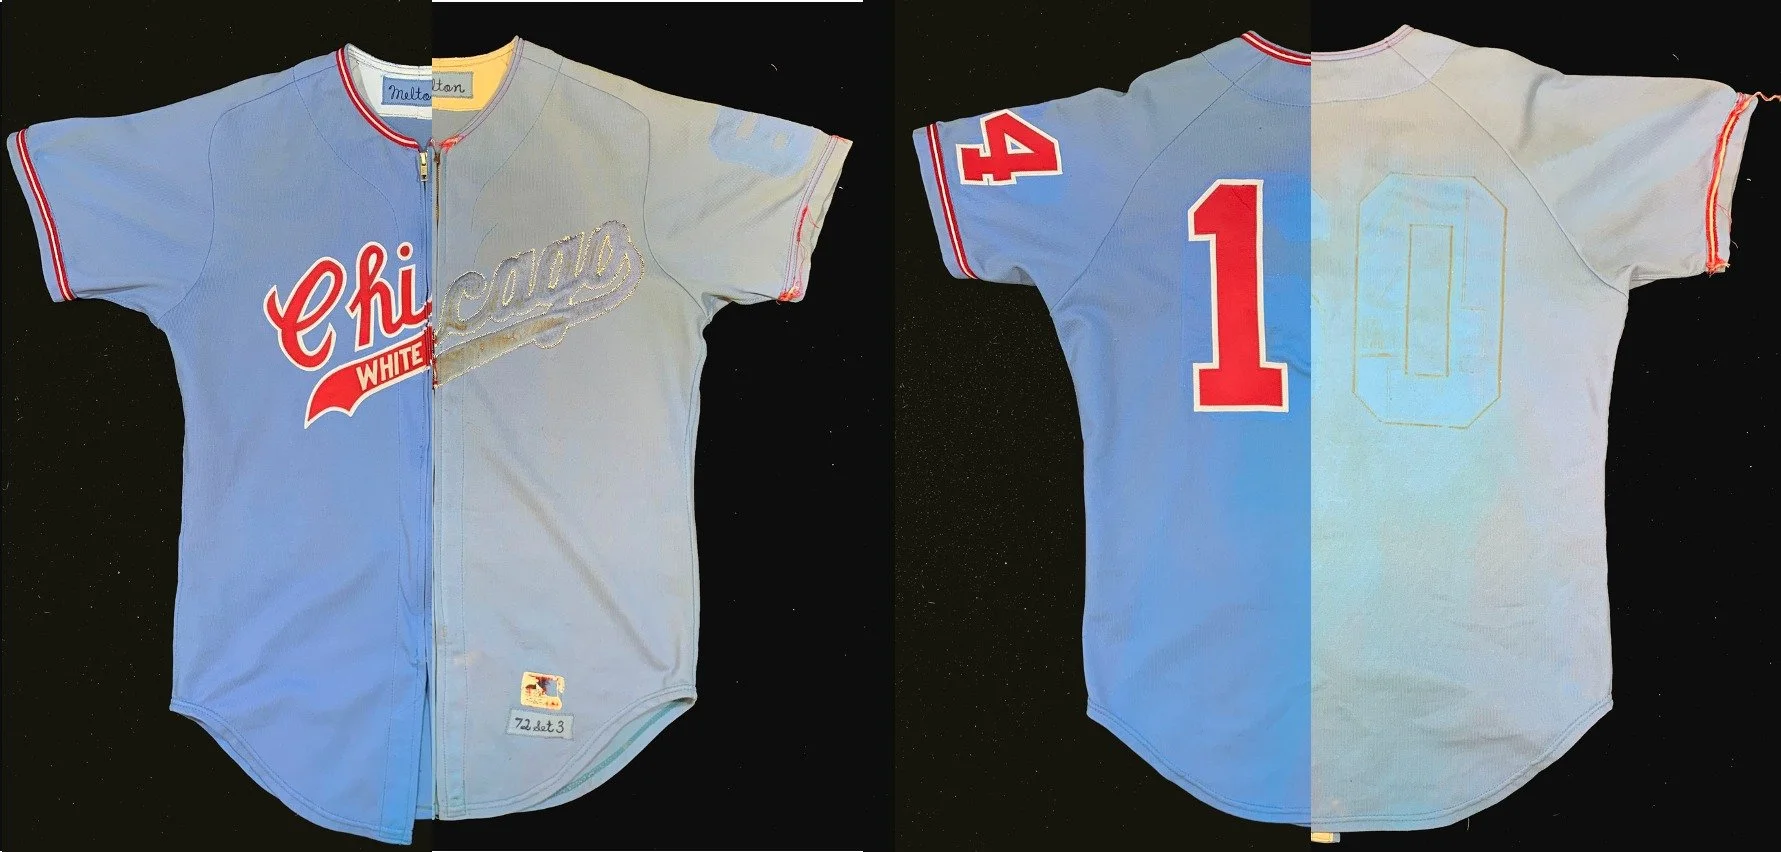
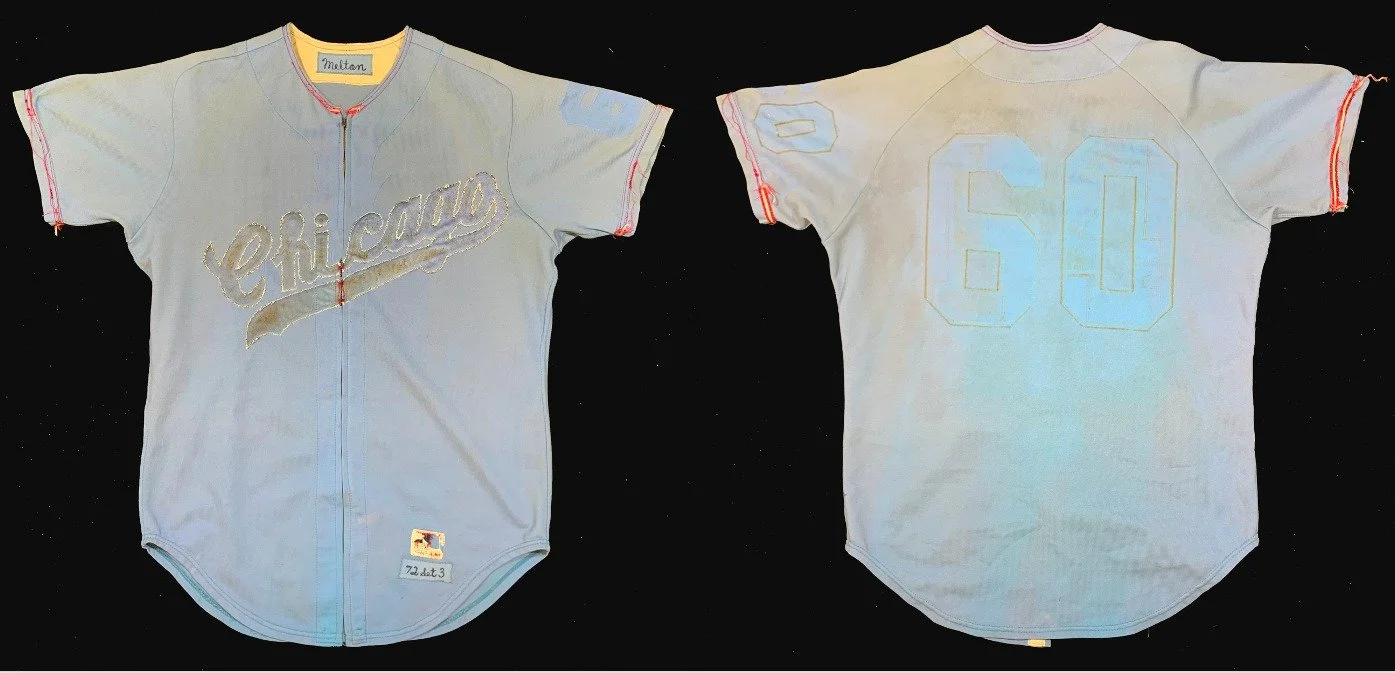
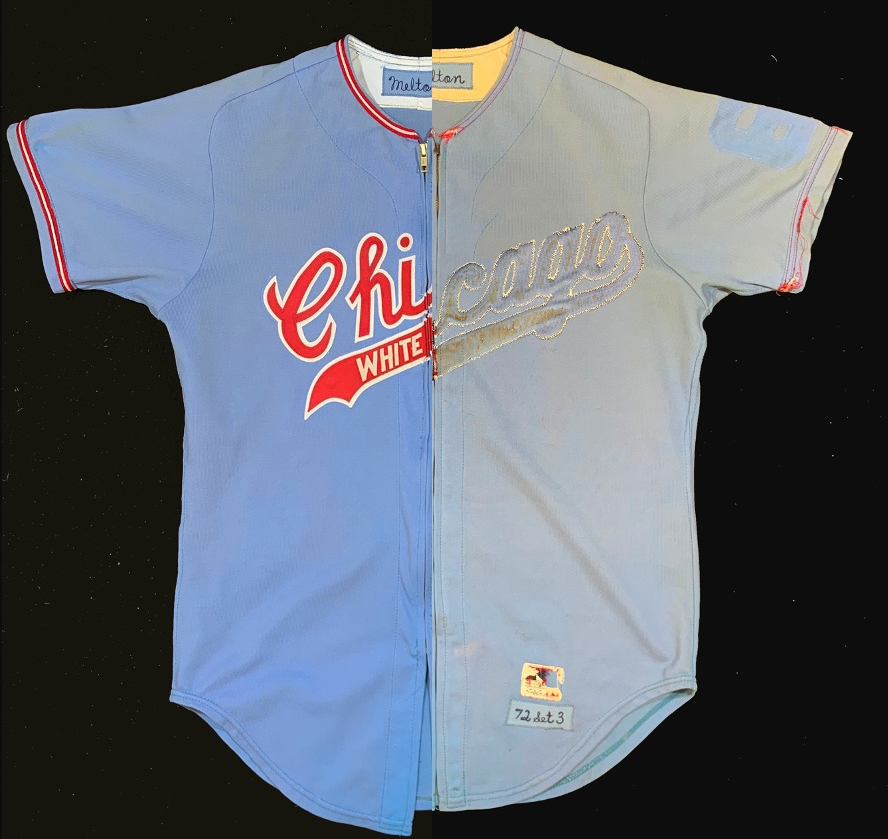
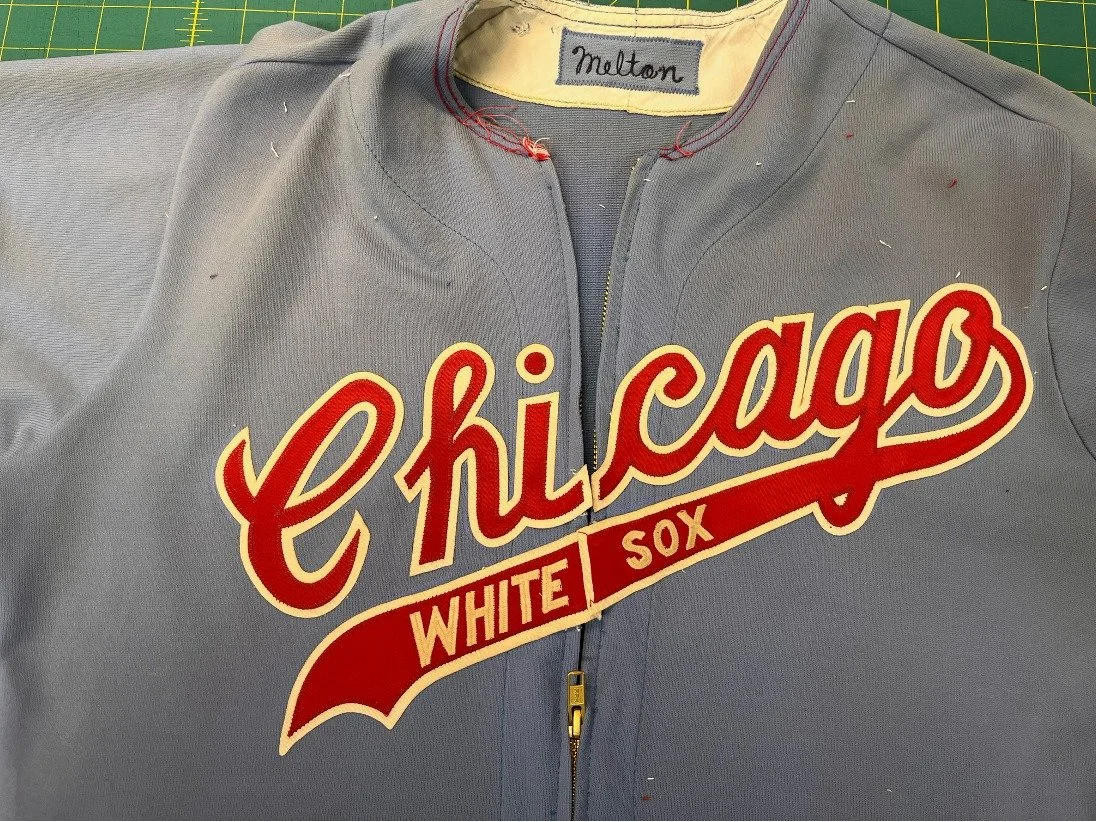
“It’s not worth saving… just send it back to me and I’ll decide later what to do with it.” That’s what Mark Fletcher, the owner of this jersey had told me. At his instruction, we had just completed another project, “borrowing” the front crest from this 1972 White Sox road knit to transplant onto and restore a more valuable 1971 road flannel. This was the bones of the donor. And clearly, it had had a hard life. From all appearances, after being issued to infielder Bill Melton for the 1972 season, it was renumbered to 60, a perfect spring training number for a prospect, and then used for multiple years in the team’s spring training camp. No roster player had been issued #60 in the five years subsequent that this jersey would have seen duty (counting 1976 spring training) “It will end up hanging in your closet for the next thirty years if we do that” I cautioned. “Then someone will throw it away. Let me restore it. It won’t be cheap, but with proper documentation it will be worth something and you can sell it if you want. These are so uncommon now, some fifty years after they were made and there are so few left.” True: In 1972, the only White Sox jerseys made were the ones the players on the team wore. There were none made for collectors of fans, and sadly most were stripped of the front script and sent to the minors. Precious few remain. Mark agreed. And he specified that he wanted it restored to look old— having the lettering media blasted and dyed to make it match the patina of the garment to which it would be sewn. And so we began the process of restoring a jersey that otherwise would have been discarded and forgotten. This was our starting point. A very dirty, badly stained jersey shell, naked and with shredded trim. Prior to me getting it, someone had removed the numbers “60” and then likely seeing how badly it was stained underneath, just gave up on it.
Close up, we could see what appeared to have been a washing machine disaster, the fabric was stained purple in many spots, then bleached by the sun especially on the shoulder tops as is common. Glue and thread remained showing the outlines of its history. The front zipper was also history, hanging like a spiny noodle from the placket.
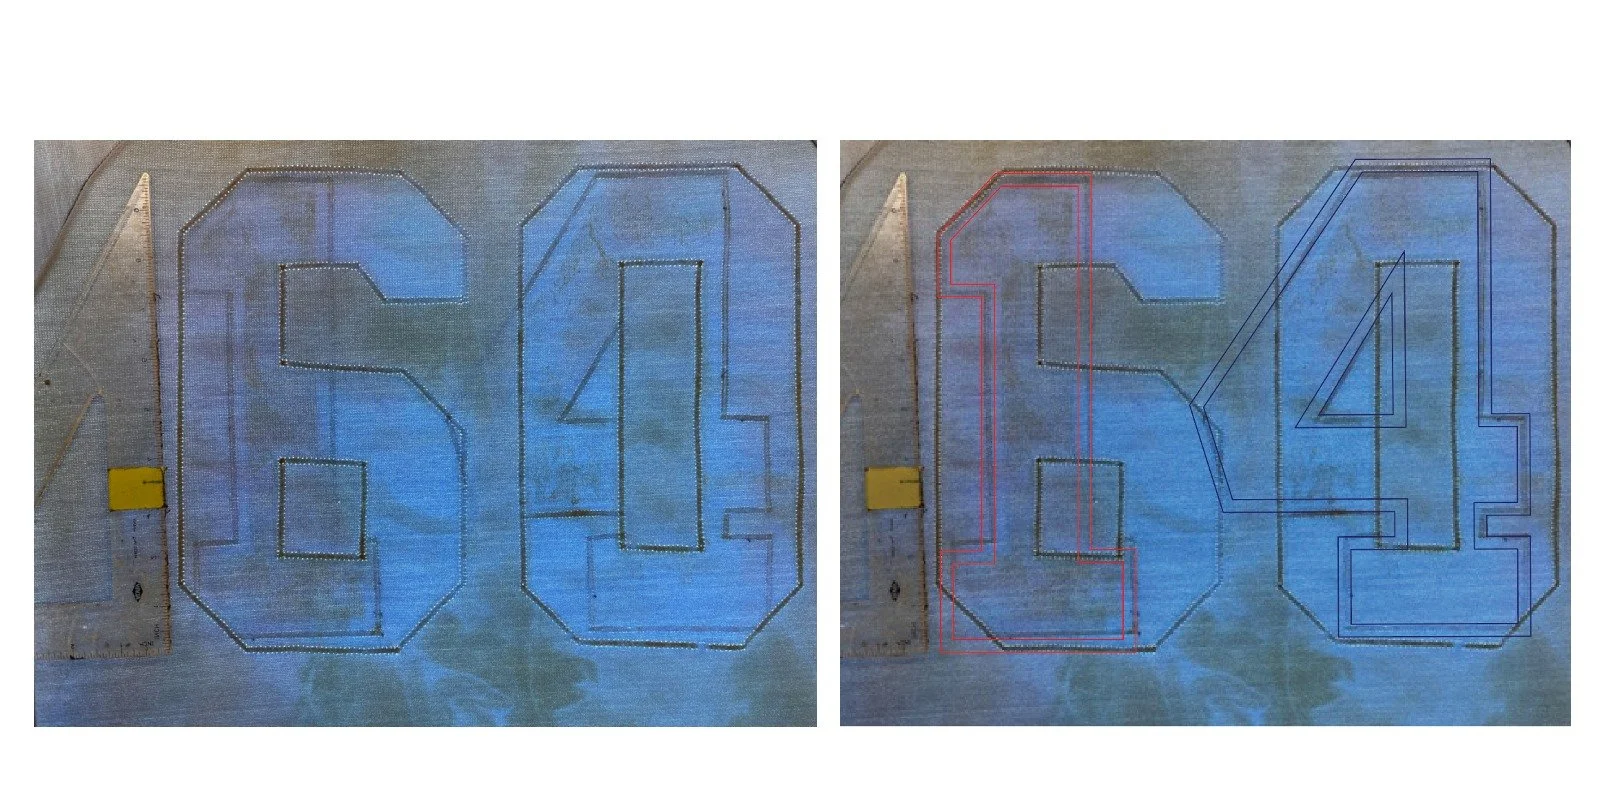
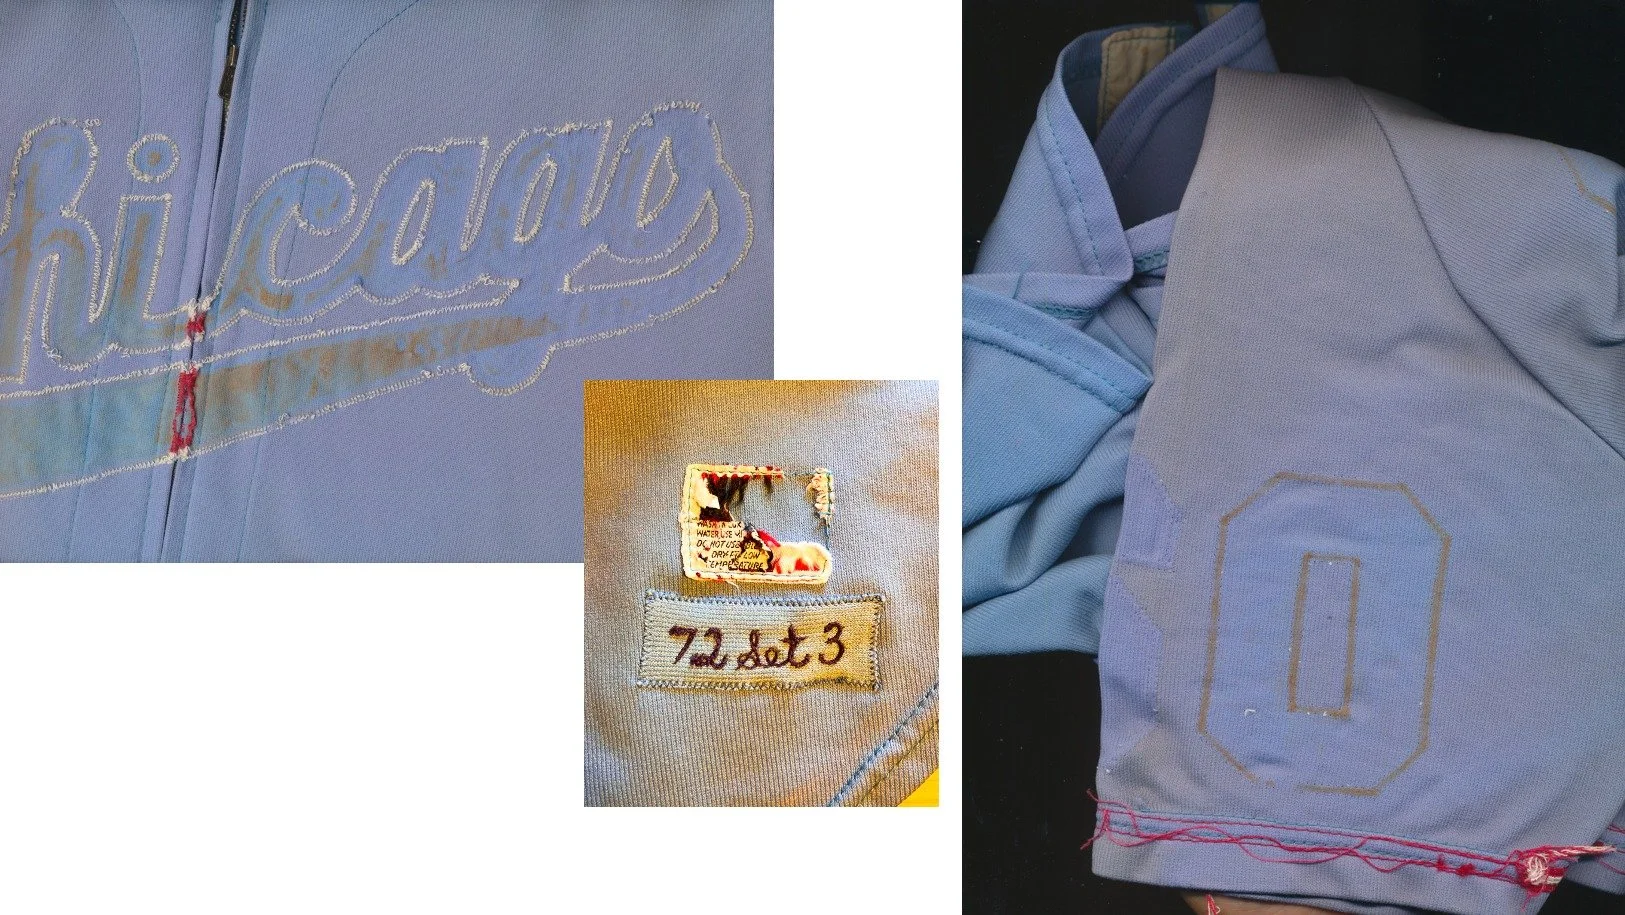
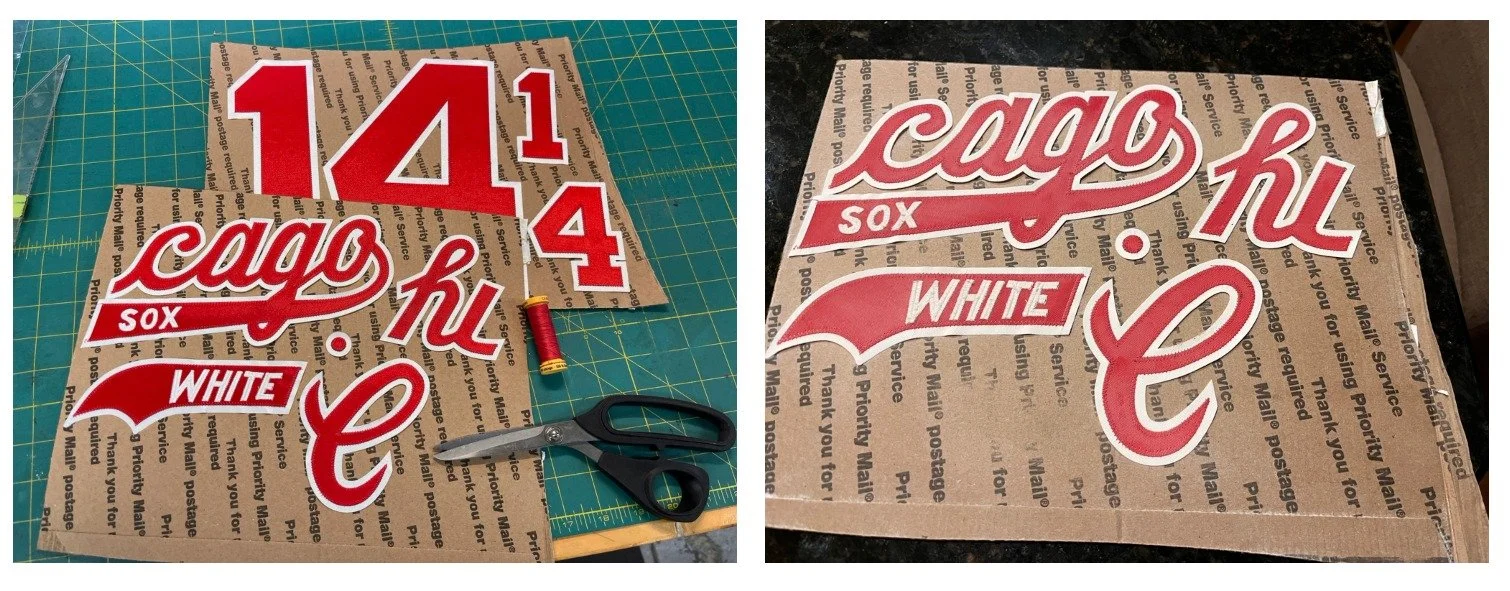
The light table is used to lift the images of what was once sewn to it. After doing this for many years, I have amassed a fairly compete set of team patterns culled from handling and authenticating so many jerseys. But when a jersey is this worn out, the fabric has shrunk and distorted from use and hot water washing. On top of that, most original lettering was hand cut with scissors, so no two jerseys are exactly alike.I needed to be sure that the lettering I cut would exactly cover the rather pronounced ghosts. Here you can see the outlines of the original 14 from the back. There is some distortion in the fabric under the “4”. I do not cut lettering with distortion baked in, rather I cut it to spec and then shrink it with steam once cut to make it conform.
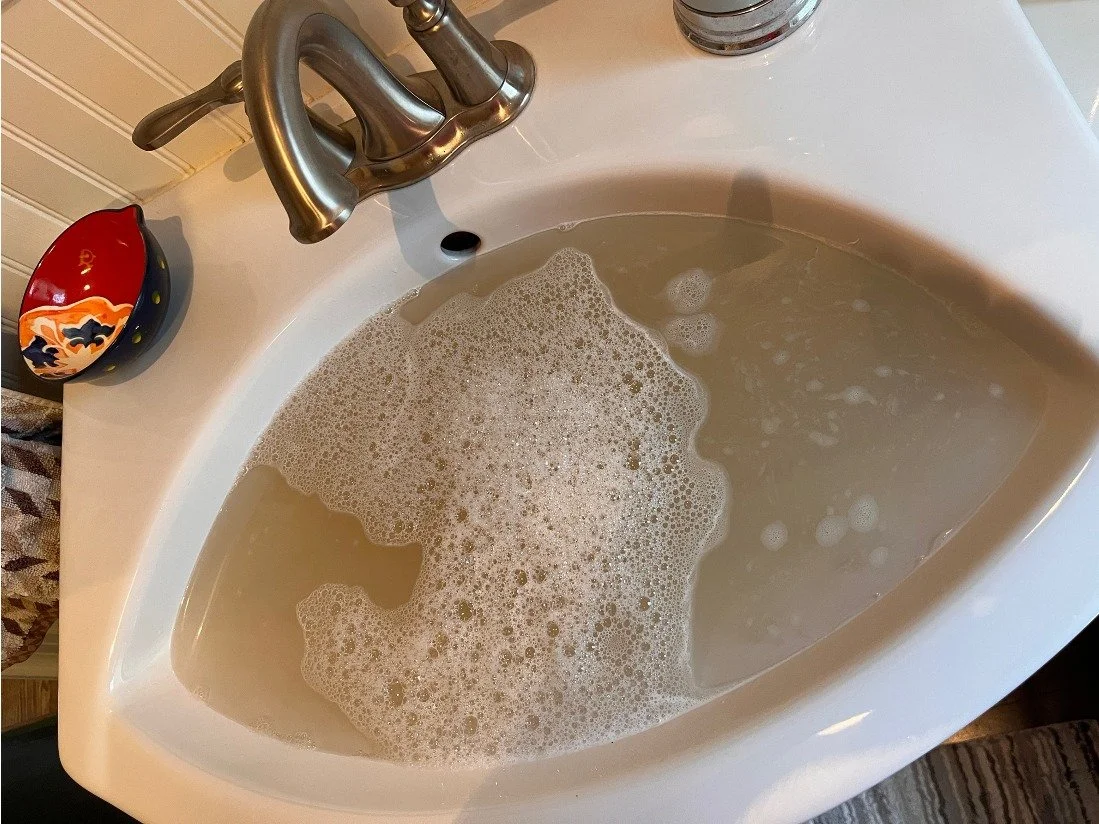
Mark had told me that he had washed the jersey before he sent it to me. Nevertheless, this is what my hand-washing in Oxiclean generated. I then hand scrubbed the stained fabric with a mixture of Oxiclean paste (powder barely dissolved in a little water) and a diluted solution of Clorox. (I do this outdoors and wear a hazmat mask. I value my health.)

After thoroughly rinsing multiple times in clean water to remove all traces of the detergent, I dry the fabric by lying it flat in a towel and then tightly rolling it up in the towel. Then I hang it to dry in the sunshine.
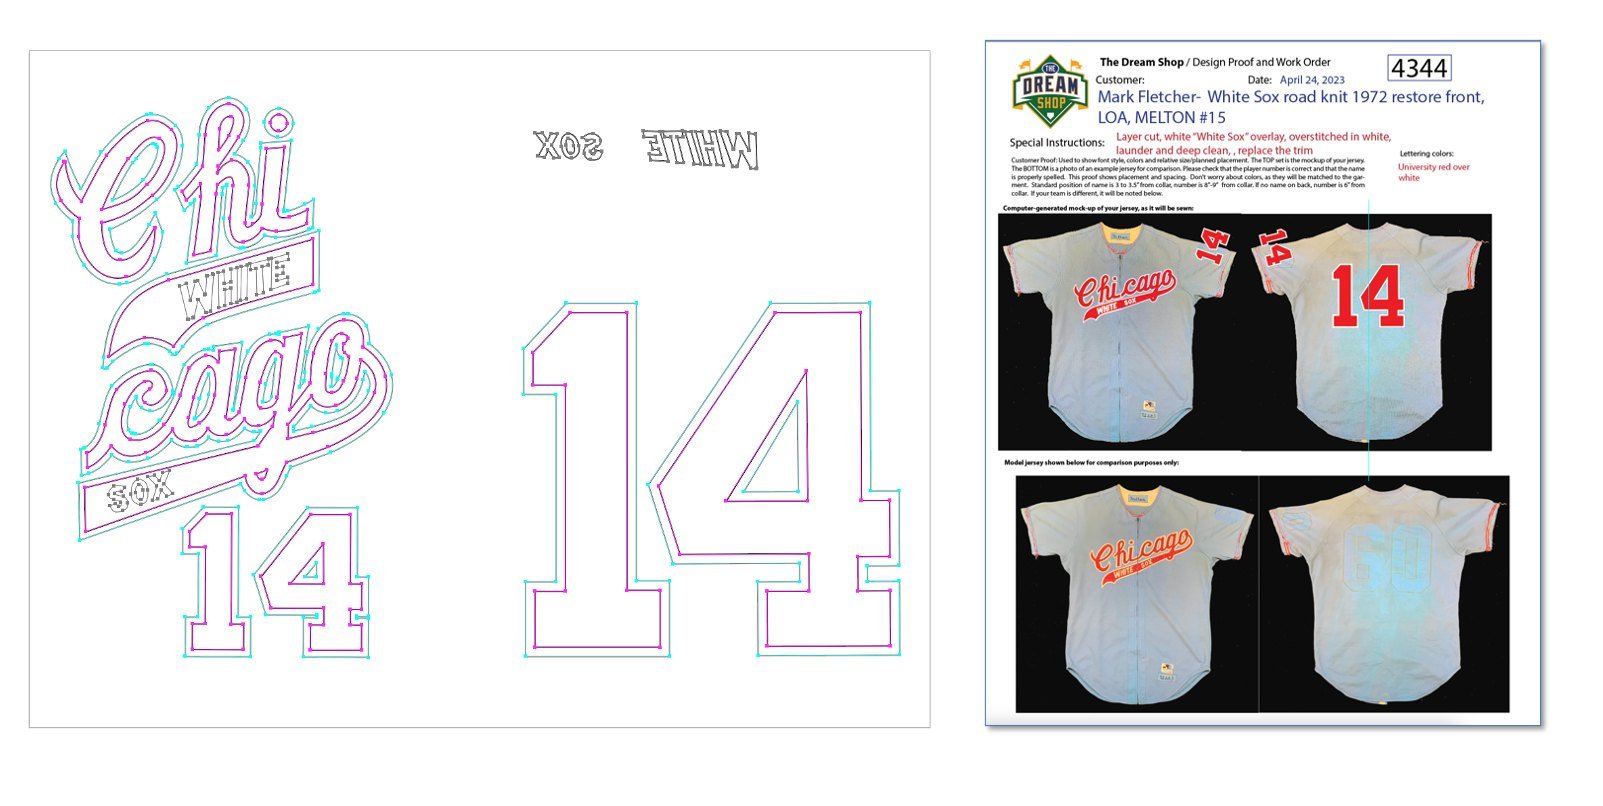
Meanwhile, I create all the cutting patterns on the computer in Adobe Illustrator. The red fabric we will use is the slightly lighter color called University Red, not bright Crimson Red. I have found that when we age-distress the lighter shade it looks more true to the aged patina we are seeking. The cut pattern images laid on top of the jersey photos create the proof I next sent to Mark to review and approve. Every job that goes through here gets a proof. It is and important sept in quality control, and gives the client a chance to preview what the final product will look like and make changes if he/she wishes. No surprises… no mistakes…no rework.
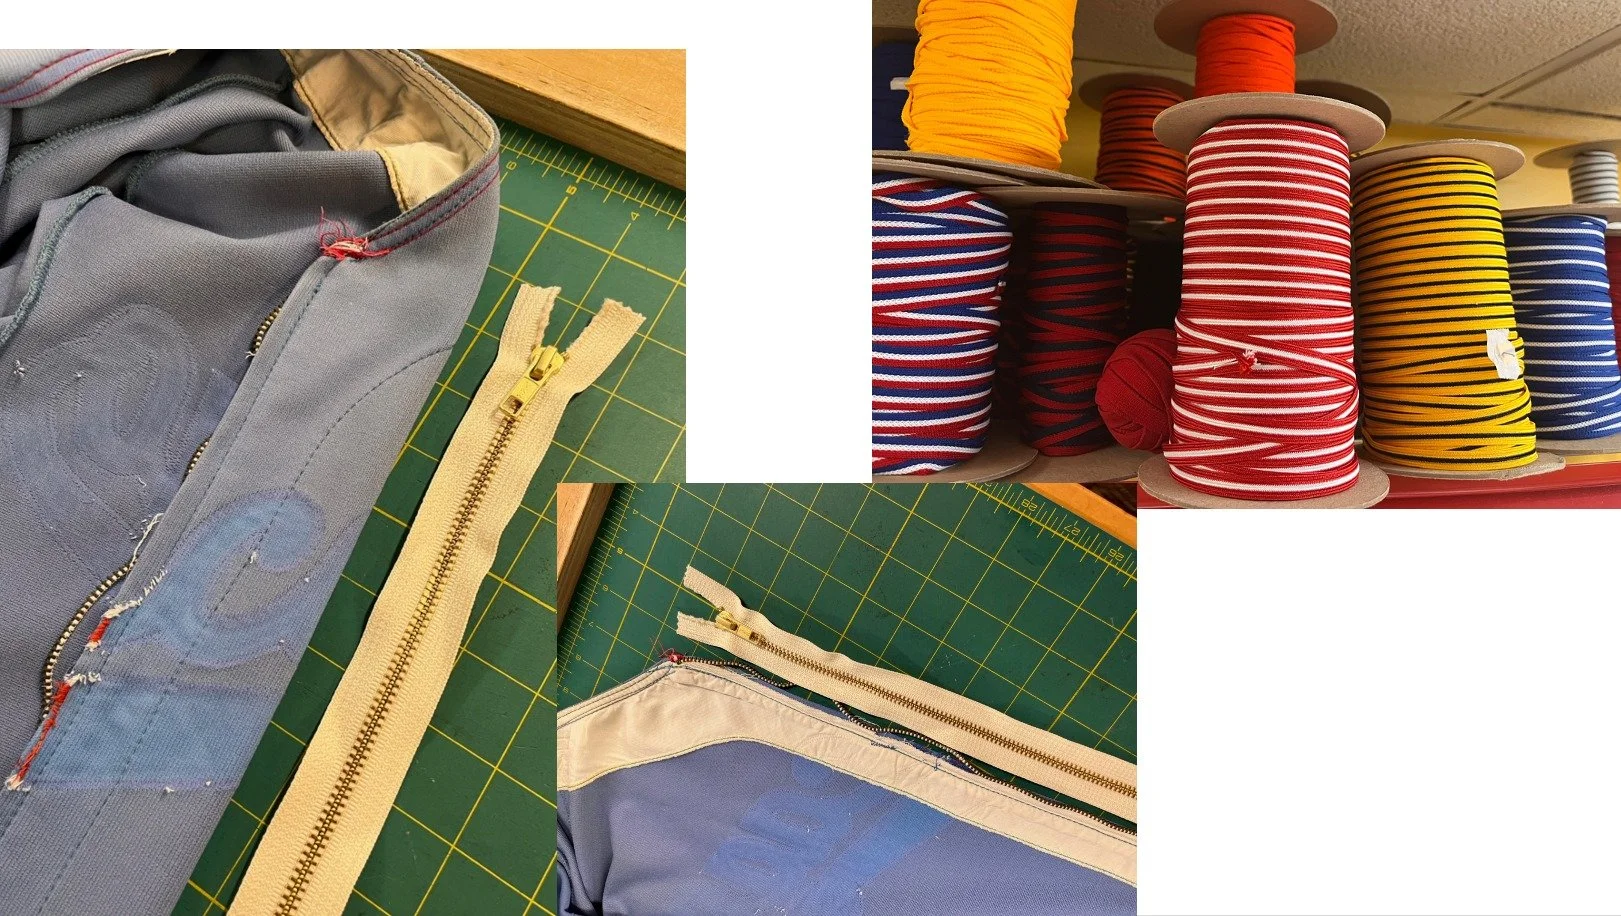
The jersey needed a new zipper. I was able to source a brass replacement with an identical white backing to the original. Original 1972 zippers were made by Talon, and these are available with a lot of searching from vintage stock, we oped to go with one that looked identical but that lacked the Talon lettering on the tab saving money and time. Trim needed to be reapplied. This 1972 knit used the old style flat woven nylon uniform braid that was common during the flannel uniform era, not like the polyester trim that is used today. Luckily I have a vintage collection of trim made on the original machines and from the original supplier that created this roll some fifty years ago.
After cutting the lettering, I test-place it on the garment to see if it covers the shadows. The small ”WHITE SOX” lettering on the tail of the logo was hand embroidered by seamstress Emily, who also sewed in the new zipper, the new trim and all the lettering. We use off-color thread to make it look like it has been washed many times vs. how it would have looked brand new.
The next step is media blasting. Tacked firmly to cardboard, the lettering is placed into my full-sized blast cabinet and strafed with a hand-mixed compound of abrasives that dull the sheen of the twill, soften the edges and make it look like it’s been used and washed a bunch of times. The photo at the right is AFTER blasting— notice that some areas of the printed on ink on the cardboard has been blasted away. That’s how I know when we have done it enough! I also similarly blast the trim to age it, pre-sewing.
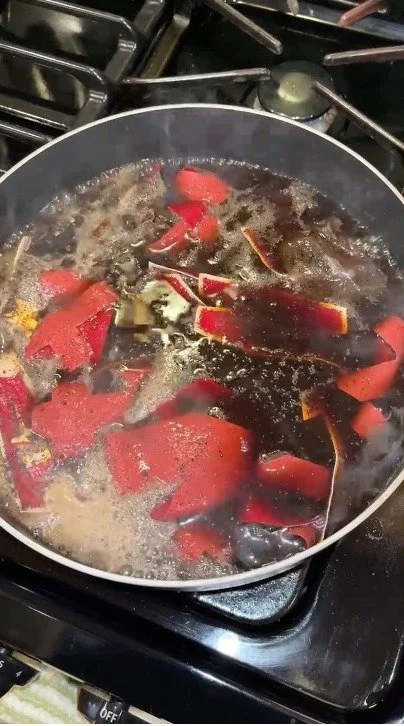
Normally impervious to dyes and bleach, tackle twill has a precious few substances that will stain it and make it look old. I mix up this concoction in my kitchen, and because this lettering is to be severely aged, I boil it on low for about ten minuets on the stove, I also boil the trim in the stuff.
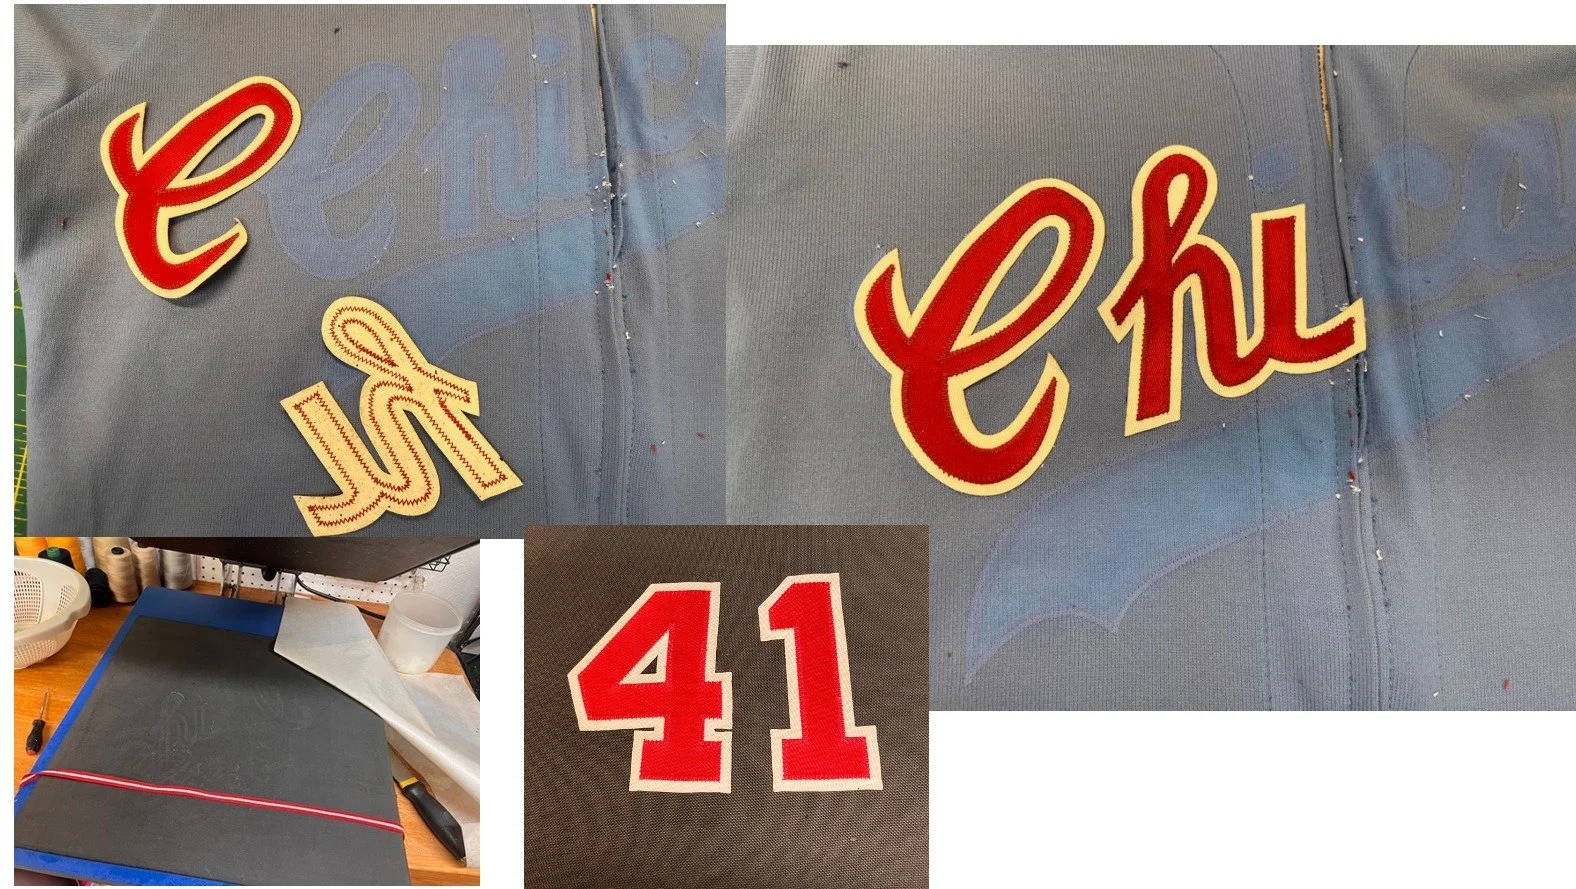
Once the dyeing is complete, I rinse and leave the lettering wet. Working with the newly clean jersey on the light table, I aggressively steam the cut and sewn lettering on the plate steamer to make it conform to the shapes of the ghosts on the shirt. I wear gloves to do this, because steam is hot and dangerous. Subtle tweaks in the shapes of the lettering can be made while the pieces are hot with steam. I also steam the trim the same way to give it some age and pucker.
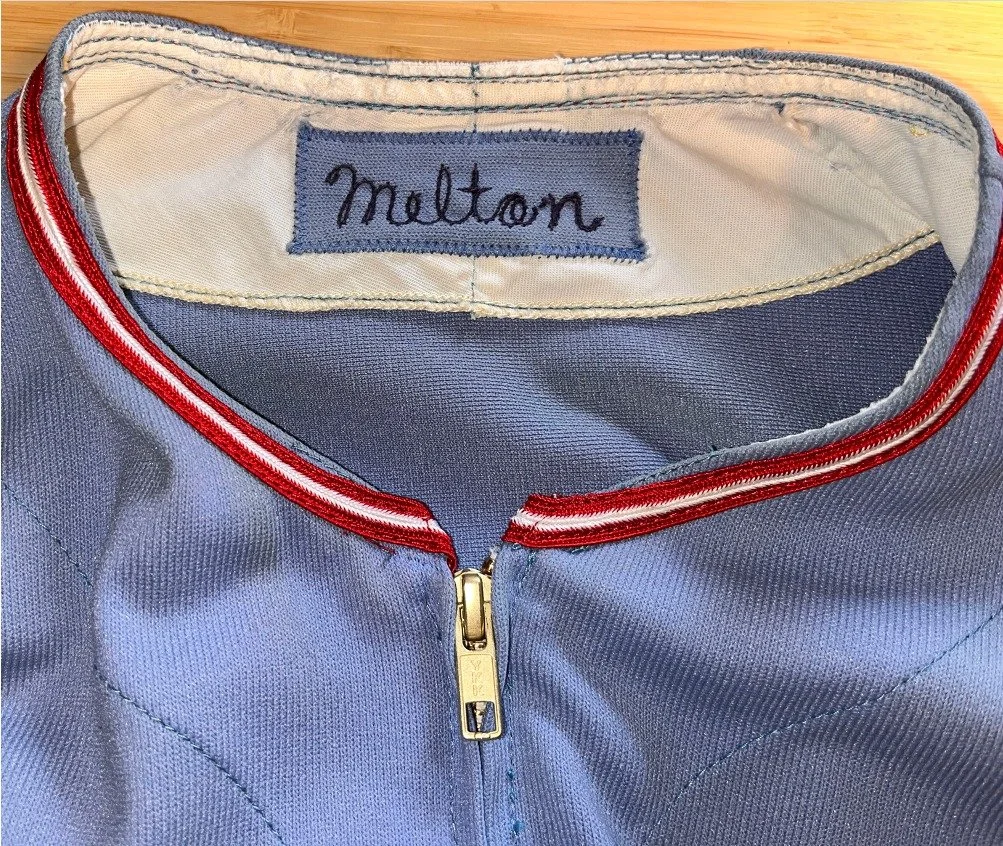
Emily stitches the trim in place, and you can see how bright and clean the formerly yellowed linen lining inside the collar is after all our work.
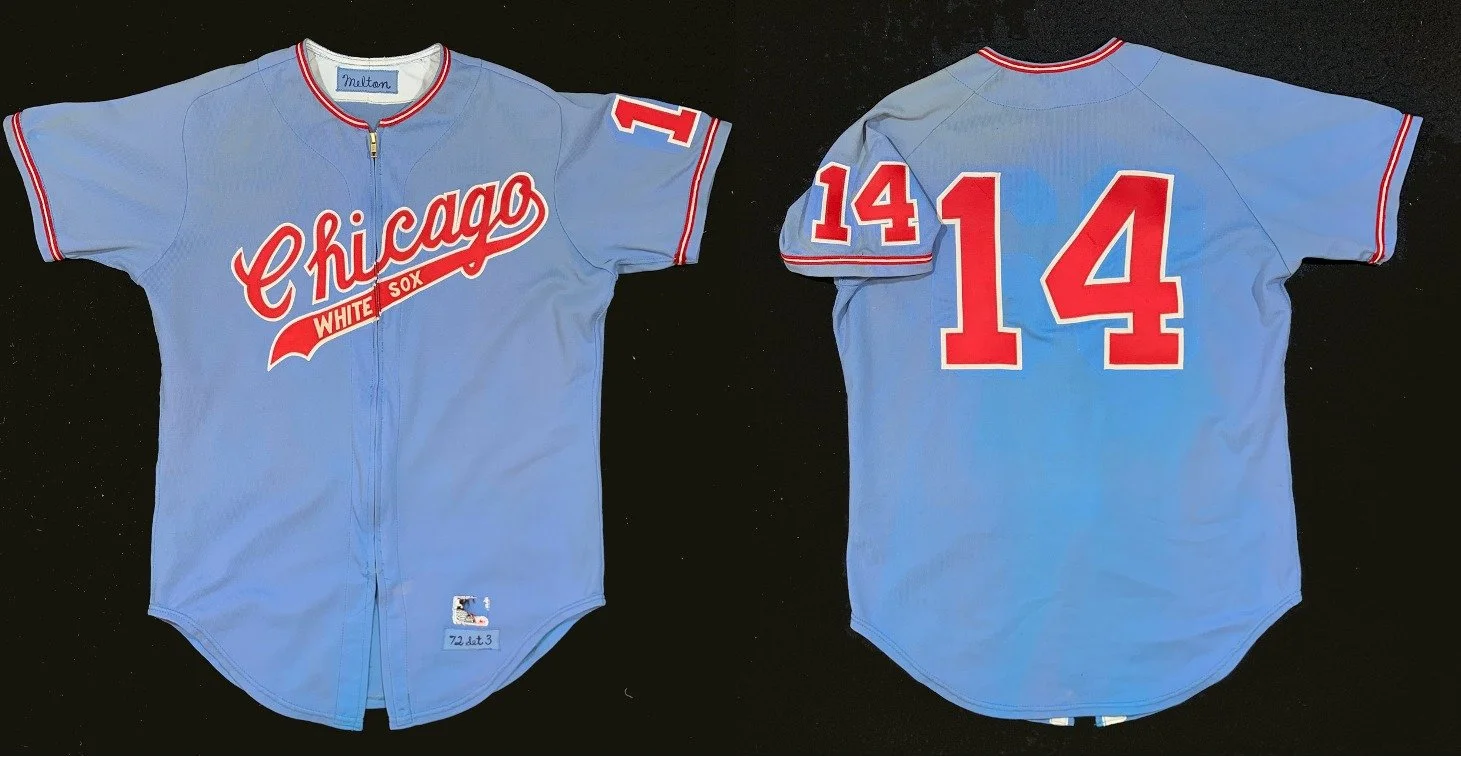
The final result! This jersey will never pass for new… nor should it. It is still discolored in spots, but the overall garment has been brightened considerably and the color evened out from our careful but aggressive washing. The replacement trim looks just as it should, not jarring and new, but slightly yellowed and harmonious with the fabric it compliments. The aging of the twill is subtle… you don’t even notice it, and that’s the point. If left crisp, shiny and new it would look out of place, like a shiny new fender on an old car. There is some intentional distortion of the “4” on the back that matches the ghost beneath. Notice that we do not touch the tagging: tagging is like the serial number on a car or a gun, and it should never be tampered with even if missing or in bad shape. Sure, a jersey with original tagging in perfect condition is worth more than one that is worn, but beware: tagging that is tampered with even with all good intentions makes the jersey all but worthless to serious collectors, and many auction houses will not even touch such an item.
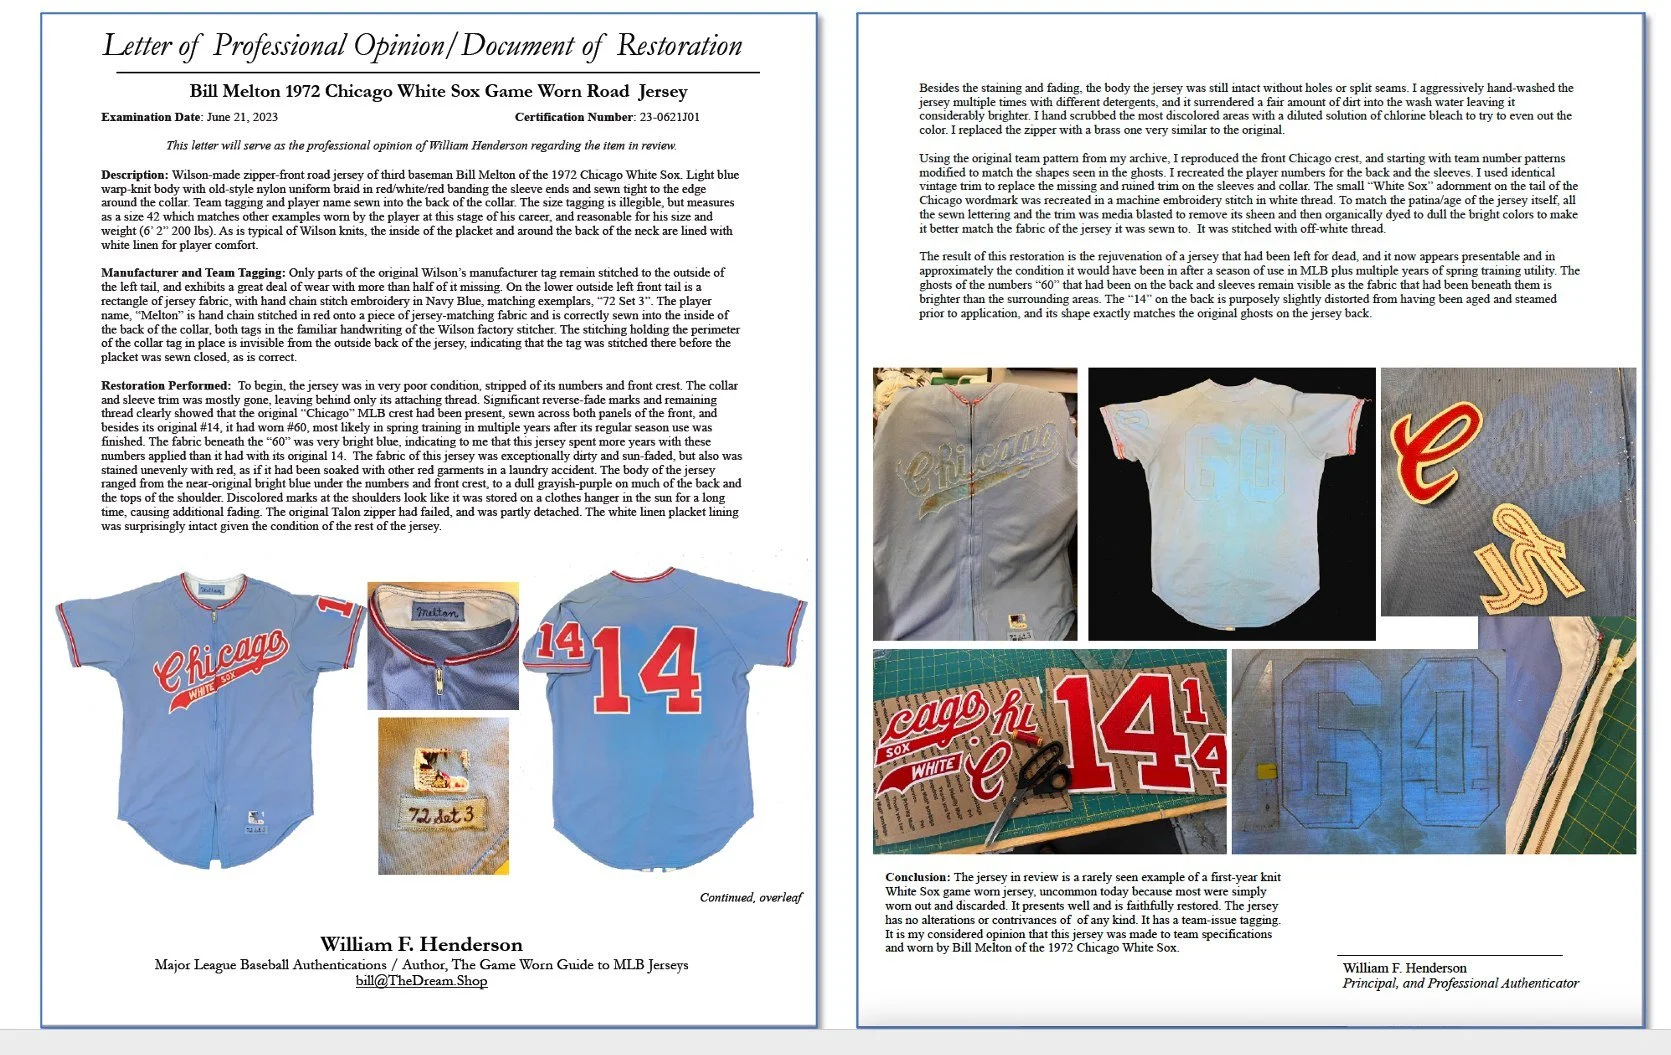
Every jersey that is restored deserves a letter of restoration documenting the process. We’ve covered this here before, but the reason is simple: this document shows the before and after and describes the process. Without it, when placed on a light table, the authenticator will only see the outlines of the numbers “60” on the back and the sleeve, and because of our careful restoration will never see the outlines of the original 14s. Therefore, he may conclude that the jersey was originally #60 and was tampered with and the numbers changed. This jersey has a full authentication as well as its document of restoration. A job like this is a lot of work, and is not inexpensive… but the end result has preserved a relic and made it something worth displaying. The documentation of its restoration and its authentication as a piece of 1972 White Sox history cements its future value when it is sold, even if that time is many decades from now. I probably do about three restorations like this one each month, though most are not this dramatic. I rarely take the time to photograph and write these up like this— it just takes too much time, I’m afraid! On to the next project.